

Mixed reality multiplayer interactive exhibitions using Figmin XR
Pick up the toffee hammer and get arrested by the police for being a Suffragette

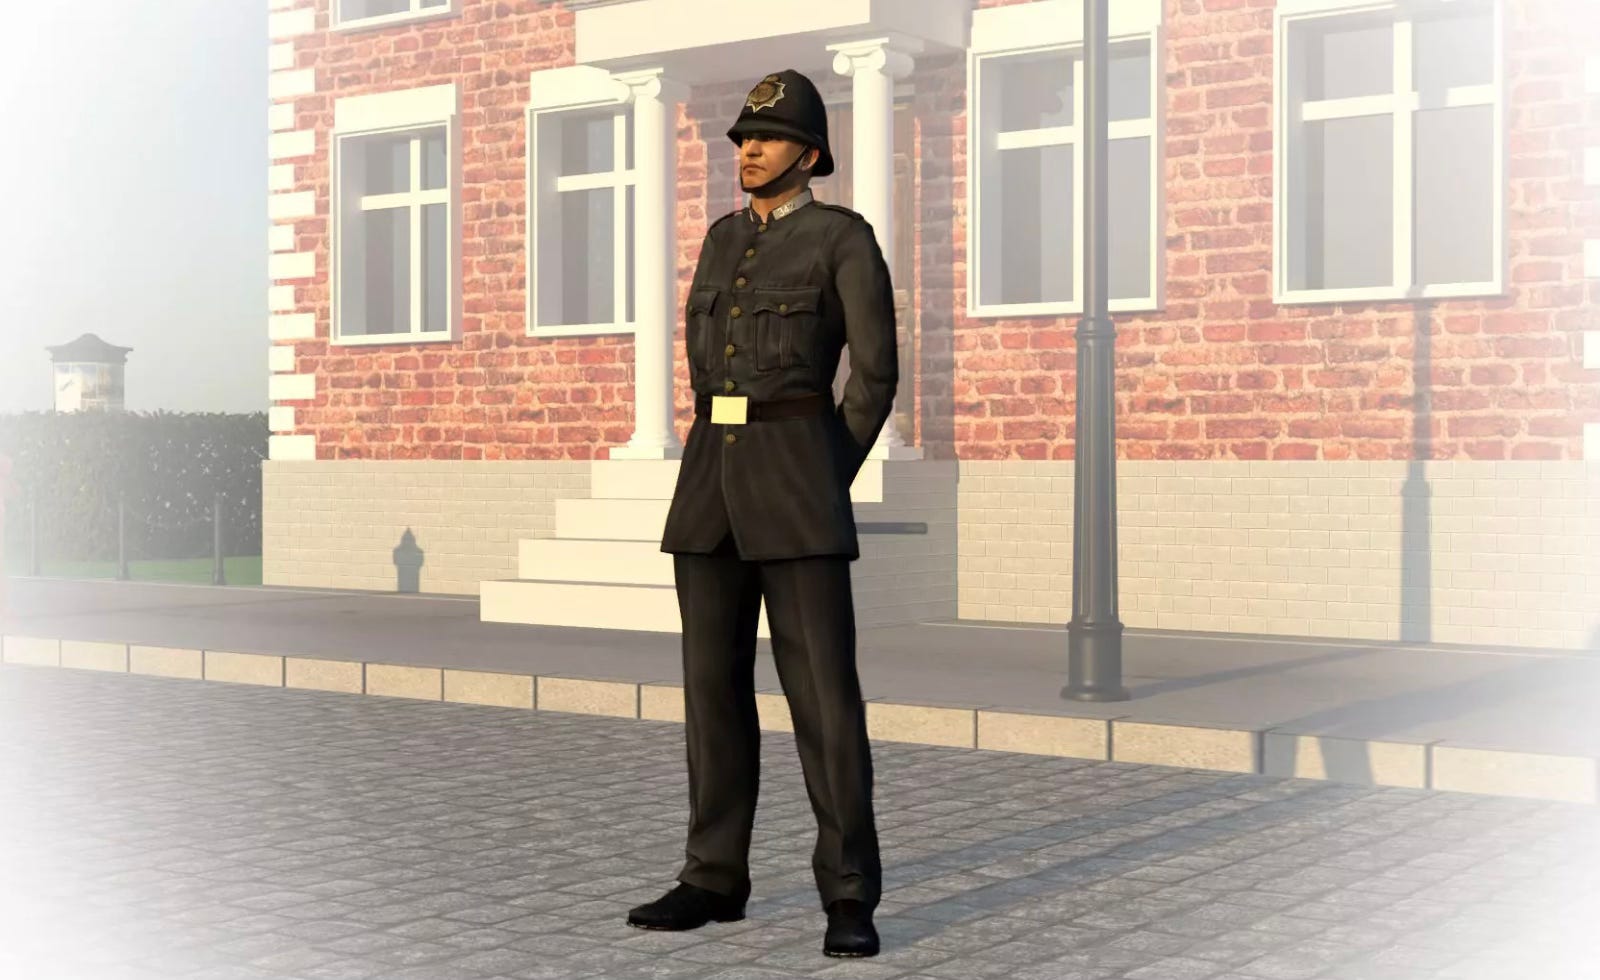
You’re in a familiar space with a small group of your friends, a classroom, transformed with digital objects arranged into an exhibition around the room - not on video screens, but as virtual objects. You’ve watched a video on a virtual screen about the votes for women campaign in the early 20th Century. You see a 3D model of a toffee hammer - an everyday implement used by Suffragettes (the violent ones) to smash windows. You touch the toffee hammer. You hear the unmistakable voice of a policeman behind you: “what’s all this then? are you one of those naughty Suffragettes?” You turn around to see a policeman walking towards you. His voice gets louder as he approaches. He continues: “or are you an innocent peaceful Suffragist?” Two buttons appear: Suffragette or Suffragist. You turn to your friends and discuss which one to choose. Finally, you decide to be brave and select the Suffragette button. The policeman’s response is swift and forcefull: “right then, you’ll all ‘ave to come down the station with me and explain yourselves to the Judge. He don’t like Suffragettes. I don’t think he likes women at all!” The artefacts in the room fade away. Bars appear all around. You’ve been “nicked”. And then the interrogation begins.
We are currently developing this interaction as an addition to the successful Suffragettes and Suffragists exhibition by Tara Morton of Warwick University’s History Department.
This article explains how Figmin XR is the most exciting digital learning platform we have used. We can do things with it, travelling in time and space, that would otherwise be impossible - even in a real museum. Over the next few weeks we will be doing intensive development of some exhibitions, to explore the potential even further. If you have ideas for an exhibition, contact Robert O’Toole.
Why mixed reality rather than virtual reality
There are several stunning historical virtual reality experiences that we use with students. For example, “Empire Soldiers - A Caribbean Story” by MBD transports a single viewer back in time to the First World War to hear about the experiences of soldiers from the Caribbean. The result is deeply immersive and emotive. While in the experience the present time and location completely disappears. And so do our teachers and peers. If we want that level of individual immersion, VR is a great choice. But it is also very expensive and time consuming to create. That’s why there aren’t many great examples to use. And we can’t easily commission content to fit the curriculum. Adding convincing social interaction into VR is also complex and expensive. Last year we tried MBDs multiplayer “Theatre Electric”, which was great, but difficult to run, with a lot of hardware coordinated to make the (genuinely amazing) magic work.
Contrast that with mixed reality exhibitions built in Figmin XR. We can build for zero cost in minutes using freely available or cheap online content, or scan 3D artefacts in using free iPhone apps. Groups of students can then explore the artefacts together. Digital artefacts are superimposed onto each participants view of the real world, in a synchronised way, so that they can walk up to an artefact together and talk about it. This can even be led by a tour guide. The same experience is available at the same time in VR headsets (Meta Quest, Apple Vision Pro) and mobile devices. There’s even a fully stationary desk-based view of the same exhibition for those who cannot move (Steam on Windows).
We’ve had students create Figmin XR exhibitions with limited technical training. They can focus on the creative, designerly, and academic aspects of the exhibition. And they can change things fast based on feedback.
Roman Coins exhibition created by Classics:
Exhibitions can include hand crafted features (sketching, painting, sculpting, building), 3D models and scans of real objects, sound, video, text, animations, web pages, and apps with interactions coded in JavaScript. All of this can be hand-crafted or generated by AI.
Sound is three dimensional and spatial - we can assign a sound to come from an object, meaning that the closer a participant moves to it the louder it gets, and as they turn their heads the sound comes from the direction of the object.
Rich content with depth. Directional sound. Interactivity. The social dimension. Incredibly powerful tools for creating immersive experiential learning.
Space, the final frontier
One major consideration: to do this you need a sufficiently big and uncluttered physical space in which to build and run your exhibition. It’s OK to have some physical furniture. Figmin maps the room and can recognise tables and chairs. You can even then rest virtual objects onto physical objects (so long as you don’t move the physical objects). If you are going to run it in different spaces at different times, your exhibition can be resized and rearranged later, although the more complicated it is the harder this gets. There is also the option to run an exhibition in more than one physical space at the same time, with people participating and talking to each other remotely (this is a bit mind blowing! they can be anywhere in the world) - consider the spaces available in all locations to make sure it works well. Every Figmin scene has a centre point that we can reposition and realign. This is how we synchronise a scene running in multiple headsets or locations. Put a physical marker on the floor to act as an anchor and a direction marker, then arrange the scene centre in each headset/location to match.
How Figmin XR makes building and running exhibitions easy
Figmin XR runs on Meta Quest and Apple Vision Pro headsets. As we’re not billionaires, we use sensibly priced Quests (£300-£500). These work in “pass through” mode, where we see digital artefacts superimposed in 3D. They also have 3D sound projected around the user’s head. The headsets allow 6DOF (six degrees of freedom movement around a physical space). Figmin also runs on iPad and iPhone (£9), where the user holds the device up in front of them and sees digital artefacts on an image of the real world. Updates of the view are smooth and continuous as the user moves through physical space. Sickness is not a problem in any of the platforms.
A desktop version works on the Steam gaming platform on Windows (£9). This is recommended for developing complex interactive exhibitions.
All of the exhibitions we have created so far have been assembled in the intended physical location by someone wearing a Meta Quest headset.
Collecting content for a scene
We use videos from Youtube and 3D objects from Sketchfab. We can also easily make our own scans of objects in 3D (in many cases, using free phone apps, more info below). Images and audio files are sourced from web pages, or put onto web pages to make them accessible in the headset. We also create web pages that can be embedded into scenes - if you have more than a few words of text to display, this is the best approach. We can even add code into the web pages to make them interactive or to control objects in the scene (that’s how to make a policeman appear and speak when the toffee hammer is touched).
Still working on a computer, the list of links is added to our Figmin XR account. These links can then be accessed in the headset to speed up the process of adding content to the scene.
Alternatively, we can create a web page containing links to the content we want to use. This can even include images, 3D objects and videos embedded in the page. Then open the page in the headset and drag and drop into the scene. In the long run it might make sense to create these pages in an online museum system like OmekaS.
Setting up the physical/virtual room mapping
Figmin XR will scan your room looking for walls, ceiling, floor, and (this is so cool!) furniture. If we switch on gravity and physics for the scene, objects fall to the floor or sit on top of furniture (if we place them carefully). This is part of the sophisticated physics system in Figmin (we can also vary the amount of gravity, and even create forcefields on objects that attract or repel other objects).
Sometimes we import 3D models of rooms, whole buildings, landscapes. Let them drop to the floor, resize and reposition. Within seconds you can be walking in a Roman villa.
We also need to be aware of the scene direction, set using the scene center tool. The scene has an x y z coordinates system, meaning we can position objects according to the same room alignment. Objects can then be precisely located and rotated. 1 unit of measurement in the Figmin maps onto 1 metre in the real physical space. Use this to design layouts before building, and then set the position of objects. These locations can also be set and changed in program code (see below). We could, for example, specify a set of objects and their precise locations, and have them generated and placed by a program, or by AI.
The scene will come with a simple virtual lighting set up, but we can also move the main lighting, add extra lights, change brightness etc. This can make a big difference to an exhibition, putting the spotlight on the artefacts, and even giving subtle cues as to where to move and look.
Building the scene
One of the standout features of Figmin is that building a scene is actually fun. I like to start with the exhibits, retrieving them and putting them into the room using the methods described above. We might follow a strict layout, accessing the properties for each object and setting position, size, rotation etc. precisely. Or adjust to what seems to work for the viewer. Consider how positioning will work for people of different heights - primary school children need things to be lower. All of the usual principles of exhibition design apply. We can also add some interactivity and adjust the physics of individual objects. We might add audio to play when one object is touched, or when objects touch. Objects have “colliders”, which are zones around them that can trigger events when colliding with something else.
Videos from YouTube can be placed into the scene, volume set, as well as looping.
Web pages are added as “apps” and placed into the scene. The user then interacts with them in the same way as in any other browser. Note there is currently a limit on the number of apps that can be saved in a scene, so we get around that by adding apps through code when the scene starts.
Locking objects
Once we have an object in position, we can lock its location so it doesn’t get moved. Unless we want it moved. Sometimes we want people to be able to pick things up and examine them, or even more. We might want to add some code so that the object cannot be moved beyond a specific point in the scene.
Saving and publishing the scene
Saving saves the scene, content and current state to the storage on the headset. Publishing makes it available on other headsets - publicly or privately.
Portals - jumping between scenes
Something we haven’t tried yet. We could, for example, add a button to a scene. When it is pressed the user is “teleported” into another scene (the new scene is loaded in place of the old scene).
Reloading the scene and coordinating headsets
If we are using Figmin in a previously mapped space, it will be recognised, and the scene loaded into it appropriately. Otherwise we need to map the space, set its physics, load the published scene, and set the scene centre if necessary. I think that scenes get loaded according to the direction we are facing when we load them, so we can control this by always facing the right way. We can load the same scene into multiple headsets and position them all the same, so that people can walk around the scene together in a coordinated way (see below for more details on making it social).
Play mode and console mode
Scenes are created with Figmin in edit mode. When we want others to use them without changing things, we can switch to play mode. Console mode goes further, hiding the Figmin control panel.
Guided tours with physical or virtual colocation
With a scene set up in multiple headsets, and oriented uniformly, people can experience it together. But if we want them to be able to interact together with objects, we can load them into the same virtual space. So for example, in our Roman Coins exhibition we had some coins on a table that could be handled. Two headsets were in the same virtual space, and the users could pass coins to each other. Exact alignment of the scene centers is essential for this.
And of course there’s no reason why the people who are collaborating have to be in the same physical location, they could be anywhere on the planet (maybe not yet on the ISS, due to internet speeds).
Sourcing or creating 3D models and scans
Most of what we use is sourced for free from the online platform Sketchfab (when searching, check the options for “downloadable” and the appropriate Creative Commons usage options (options in red will list paid-for content). Sometimes we pay for models through Sketchfab or CGTrader).
3D models are created using design tools like Blender. Models are either architectural (e.g. a building with rooms) or artefacts (e.g. a car). They can be static or animated. To animate a 3D model, it has to be “rigged” - the axis of movement (for example, knees, elbows, shoulders) are turned into movement points (using the freemium software Accurig), and then sequences of movements created (Actorcore provides sets of pre-designed movements such as running, jumping, dancing).
We can also scan landscapes, buildings, rooms and artefacts to become 3D models. This is big business, with some seriously expensive kit and skills. Or we can just use our phones and get good enough results 90% of the time. KIRI Engine is currently our favourite scanning app. We have also used Polycam. This mostly uses photogrammetry (where hundreds of individual photos are merged). Some more expensive phones and tablets (like my iPad Pro) have LiDAR scanners, which add Light Detection and Ranging using flashes of light. This is more effective when scanning smoother surfaces.
See this article about scanning, with an example scan.
Adding interactivity with JavaScript coding
Earlier in the year (2026) Figmin developer Javier Davalos added a breakthrough feature. Create a web page and add this tag at the top:
<meta name=”figmin”>
Then this JavaScript:
document.addEventListener(”FigminReady”, init);
function init() {
const model = figmin.createObject( figmin.ObjectType.MODEL3D, {
url: “https://warwick.ac.uk/dahl/projects/exhibitionbuilder/drum_from_botswana.glb”, position: figmin.getWindowSpawnPosition(0.1, “right”),
} );
}
Load it into a app (a browser window) in a Figmin scene, and the model of the drum appears automagically, positioned just to the right of the app window).
Pretty much everything is automatable using the figmin application programming interface. We can trigger code from within the web page, or through events in the scene. So for example, two buttons appear: “Suffragette” and “Suffragist”. You press the first, and are transported into a prison cell (pressing the button triggers code that sends you through a portal to a different scene).
The possibilities are amazing, and we are only just realising how this could be used in learning.
Generating content and interactions with AI
So just as we’re working out what to do with the new JavaScript API, along comes AI. Javier has also added the ability to connect to an external AI agent from within the scene. The AI agent knows about how Figmin works as it has been given a skill.md file describing the features and how to do things. We can ask it, for example, to create an object based on our description. Or add JavaScript code. In this example, the AI is shown an image of a house and it instantly generates a good 3D model of it.
Casting to a big screen
Quest headsets have a built in mechanism for casting the headset view (exactly what the user is seeing and hearing) in real time, to an iPad/iPhone running the meta app, or a Chrome web browser signed in as the same Quest user and viewing the page Oculus.com/casting. We can use this in the development process, to watch how users are interacting with our design; as a training tool, to show people how to use an exhibition; or as a public demo (popular with 3D artists).
Filming tours
One final point, we can record the action that we see from within a scene in several ways. The Quest headset has its own image, sound, and video recording mechanism. Figmin allows us to add and use a camera. We can also cast to a screen and record on their. I also sometimes view a scene on my iPad and use the native recording feature in iOS.
The future?
Figmin XR already has the features we’ve been dreaming off for a long time. We just have to be imaginative and build exhibitions.
There is one thing on our wish list. We don’t really like using Meta headsets. We prefer Pico, as we can strip back the interface and just load exactly the app we want. There’s no chance that a user could accidentally or deliberately get out of the Figmin app and explore the rest of the increasingly disturbing Meta metaverse. This hasn’t happened, and we are generally in control, but it would be nice for schools use if we could be completely in control.